Hello again,
Today I have a DIY project to share with you that I
am super excited about! I'll give you some hints and see if you can guess...
It's something we use in our house every day,
multiple times a day!
Something our toddler can use "all by
self" to assist him with good hand washing.
Something my very handy friend and I built with our
own two hands.
And, something that normally costs between
$130-$200 but we built for less than $40.
Have you guessed it yet?!? Probably not, so
I'll just tell you
A KITCHEN HELPER....

The idea to build one of these came from Instagram
a while back. I saw a picture of a little girl (not the one shown in the picture) about my son's age in this
contraption that looked like a stool but had rails all the way around it so she
couldn't fall out. I loved it because she was able to stand in this thing
with ease and help her mom at the kitchen counter. So I looked on Amazon
and found out that this thing was called a "kitchen helper" and it
ranges in price between $130 to $200...
Not only was this out of my price range but none of
the colors/styles really matched our kitchen. I definitely wanted
something like this to assist with hand washing and allow our toddler to easily
be involved in making pancakes on Saturday mornings, but I didn't want it to be
an eye sore in our house. So, I decided to build one myself...
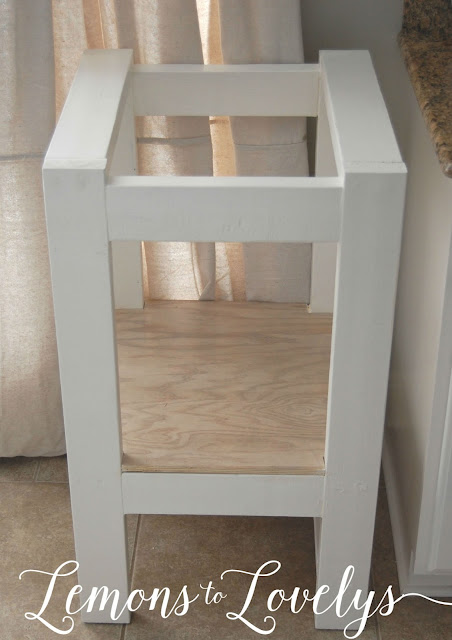
My handy friend and I built this kitchen helper to
fit the exact dimensions of my counter tops and a specific corner in my kitchen
where the "helper" would stay while not in use. With that in
mind, instead of giving you a step by step tutorial, I thought it would be
easier to provide you with a list of materials I used and then a picture of the
dimensions so that if you are interested in building one yourself, you can make
it the exact size you need...
PARTS
Materials Used:
-4 2x4's (Parts A-C)
-1 piece of oak plywood (Part D)
-16, 1-1/2" wooden dowels **sidenote-next time I would use
"L brackets" instead of dowels. MUCH EASIER and better chance of achieving perfect right angles!
-20 3" wood screws
-caulk
-paint & paint brush
-wood filler
-jigsaw
-drill & 1/4" drillbit
Explanation of Materials:
-Parts A-C were cut from 4 pieces of these 2x4's...
All cut by the nice employee at Lowes...
-Part D was made from this piece of oak plywood...
We notched out the corners of this board with a jigsaw. (see picture above for notching dimensions) I recommend doing this step last, just incase your angles are not perfect right angles and you need to make some measurement adjustments. (we definitely had to because we used dowels. your margin of error for this step should diminish with the use of L brackets)
As you can see in this picture here, the
"helper" pulls up flush with the sink so our son can push it right up
to the edge and reach over at the perfect height to wash his little
hands...
After all of the building was complete, I patched the screw holes with some wood filler and sanded them down. Then I caulked all of the cracks in order to give a more clean, flush look.
Lastly, I painted the main frame of the helper with the exact same color as our kitchen cabinets (Dove Wing by BM) so that it blends in with the rest of the kitchen. I wanted to save the beauty of the oak so for the platform, I just did a light wash of Dove Wing diluted with water (probably 1 part paint to 3 parts water) for the piece of oak plywood in the center...
Lastly, I painted the main frame of the helper with the exact same color as our kitchen cabinets (Dove Wing by BM) so that it blends in with the rest of the kitchen. I wanted to save the beauty of the oak so for the platform, I just did a light wash of Dove Wing diluted with water (probably 1 part paint to 3 parts water) for the piece of oak plywood in the center...
 |
| Isn't my model adorable??? |
I think this is by far the most practical thing
I've ever built! We use it every single day, multiple times a day.
I love it because its light weight and our little guy can push it around
and use it all by himself. It has come in handy for more things than I
ever intended and I plan to keep it around our house for years to come!
This project is a total DIY-er but I have to give a special thanks to my handy helper "Mrs. S" for seeing this project through! I couldn't do life without you!
This project is a total DIY-er but I have to give a special thanks to my handy helper "Mrs. S" for seeing this project through! I couldn't do life without you!
Well that's it for today. Send me pictures if
you make your own helper!
Have a great day! I'll be back soon with some more recipes to
try...


